Get New Clients If You Don't Like Social Media | Netklik

SPEAK to be FOUND

  • English
  • Español
  • Home
  • About
  • Work with me
  • Ebooks
  • Infographics
  • Testimonials
  • Contact
  • Blog

Archives for October 2014

Steps to safely personalize a Genesis child theme with WordPress

October 30, 2014 Leave a Comment Netklik

Tweet
Share
Pin
Share
0 Shares

When we create websites in WorldPress, it is advisable to always work with a child theme. The reason is that when theme developer, in this case www.studiopress.com makes changes to the Genesis framework, this changes will not affect our website.

How can we safely personalize a child theme using custom.css?

The same applies to when we personalize a child theme in WordPress. We have to make sure we are doing it in a safe way. It is recommended we create a new css file, custom.css, where one includes the theme personalization. Next, I will describe the steps I followed to achieve this.

Step 1: Create a custom.css file

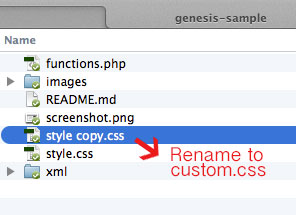
Make a duplicate copy of the style.css found in the child theme file. For our example, I am using the Genesis child them and am renaming it custom.css on my computer.
Step 2: Update the information of the custom.css file

In a text editor open the new custom.css document and delete everything except the details that describe the document, found in the upper part.

/* # Genesis Sample Child Theme
Theme Name: Genesis Sample Theme
Theme URI: http://my.studiopress.com/themes/genesis/
Description: This is the sample theme created for the Genesis Framework.
Author: StudioPress
Author URI: http://www.studiopress.com/
Template: genesis
Template Version: 2.1.2
Tags: black, orange, white, one-column, two-columns, three-columns, left-sidebar, right-sidebar, responsive-layout, custom-menu, full-width-template, rtl-language-support, sticky-post, theme-options, threaded-comments, translation-ready
License: GPL-2.0+
License URI: http://www.gnu.org/licenses/gpl-2.0.html
*/

It is important to change the Theme name: it should read:

Theme Name: Genesis Sample Theme - Customized

Step 3: FTP the custom.css file to the server

The next step is to upload the custom.css file to the serves through a FTP tool. For our example, the location will be: wp-content/themes/genesis-sample

Step 4: Associate the Genesis with the new custom.css file

Now we have to tell Genesis to read this file, and to do this we have to click the Genesis>Theme Settings option on the dashboard. In the section that reads Header and Footer Scripts, under: “Enter scripts or code you would like output to wp_head(): we have to add the following codes:

<link rel='stylesheet'  type='text/css' href='http://www.mywebiste.com/wp-content/themes/genesis-sample/custom.css'  media='all' />
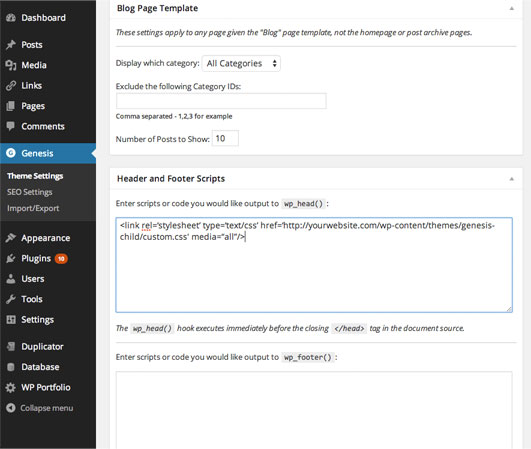
Click on Save Settings found in lower part of the page. This is the last step. Now we can go to Appearance>Editor and we can see the custom.css file that we just created, and where we will personalize the Genesis Child Theme.

Filed Under: Wordpress

Google Flight y Google Hotel Finder: Ahorro en reservaciones de pasajes y hoteles

October 16, 2014 Leave a Comment Netklik

Tweet
Share
Pin
Share
0 Shares

google flights and hotelsAs most of us who work on the web, my friendship with Google may vary depending on the day.

I was recently looking for tickets and hotel reservations, and decided to give the Google search tool a shot: Google Flights.

I have to confess that I am happy I did it. This tool allows us to check the prices of airline tickets from one destination to the next one, showing the results by price with information for alternative schedules, airlines, etc. It is possible to check the information for round trips, one way only, as well as to multiple destinations.

Once you finish selecting the route, schedule and airline, the tool allows you to go directly to the airline’s website to finish the transaction.

In addition, Google also has a tool that allows you to search for hotels: Google Hotel Finder, and I decided to try my luck once again. This tool lets you include the city where you want to do the search and the dates of your stay. It shows the results of the search with links to the hotel websites to complete the reservation. But in this case, the results include not only links to the hotels, but also to travel websites like hotels.com, bookings.com, etc. In my case, the use of this tool helped to save 40% in the hotel reservation!.

Google and I had a good day today.

Filed Under: Internet

The power of change: Amazon continues to innovate

October 13, 2014 Leave a Comment Netklik

Tweet
Share
Pin
Share
0 Shares

Without the slightest doubt, Amazon has become the internet “store” where my family and I most frequently shop.  Personally, I find it helpful to have consumer reviews when researching any product, as well as the ability to receive the product in 2 days, in the US.  Lately, we even have received the orders the following day, shipped by a local private shipper.

Here are some recent news that have caught my attention.

The following article en Amazon Spain explains how Amazon is making big changes in its operation in Spain.  Amazon has decided to open 1,200 establishments, where the client can choose to pick up his order, instead of receiving it by mail.

In addition, Amazon is offering same day delivery  of selected items for Madrid residents, when orders are placed during a certain time frame.

And to cap it all, I read the following article Amazon to Open First Brick-and-Mortar Site that describes how this internet giant announces the opening of a store in New York.  Obviously, the success attained in their website marketing is not enough for Amazon.   In the New York store, people will be able  to shop for Amazon designed products, like the Kindle, Kindle Fire, etc. The idea is to promote the Amazon brand.  If this first physical store is a success, Amazon will probably continue to open new stores around the country.

These are excellent examples of the importance to adopt new strategies and incorporate changes, in order to innovate every day.

Filed Under: Business Tagged With: Amazon

How to add Blog posts to a static home page in Genesis for WordPress

October 13, 2014 Leave a Comment Netklik

Tweet
Share
Pin
Share
0 Shares

Usually, when we develop websites in WordPress, we can choose between two options:

  1. Have a static home page
  2. Have a blog on the home page and show the most recent post

Recently I was working on a website that had a different requirement. In this case it was important to have a static home page and at the same time show the most recent blog posts below the static home page.

After some research, I found the following website that includes an excellent explanation of how to achieve this change: : http://sridharkatakam.com/show-latest-posts-content-homepage-genesis/

In order to do this, one has to register a new widget area called: Home Below Content, and then one drags the widget from Features posts in Genesis to the recently created widget in Home Below Content.

These are the steps I followed:

  1. Create the widget Home Below Content

In order to do this it is necessary to add the following code to functions.php inside the child theme:

// Register widget area
genesis_register_sidebar( array(
	'id'				=> 'home-below-content',
	'name'			=> __( 'Home Below Content', 'genesis' ),
	'description'	=> __( 'This is the home below content section.', 'genesis' ),
) );

//* Add the Home Below Content section
add_action( 'genesis_entry_content', 'sk_show_posts' );
function sk_show_posts() {
	if ( is_front_page() ) {
		printf( '<div %s>', genesis_attr( 'home-below-content' ) );
			genesis_widget_area( 'home-below-content' );
		echo '</div>';
	}
}

//* Modify the Excerpt read more link

function new_excerpt_more($more) {
    return '<a class="more-link" href="' . get_permalink() . '"> [Continue Reading]</a>';
}
add_filter('excerpt_more', 'new_excerpt_more');

2. Add the following code to the style.css file that corresponds to the child theme:

.entry-content a.alignleft,
.entry-content a.more-link {
	border-bottom: none;
}

.entry-content a.alignleft img {
	margin-right: 2rem;
}

.home .entry-content .widget-title {
	font-size: 3.6rem;
	text-transform: none;
}

2. On the WordPress dashboard, go to Appearance>Widgets, drag the widget in Featured Posts to the widget Home Below Content.  Once this is completed, it is possible to configure it. For example, it is possible to specify the categories one wants to show, the number of posts, it one wants to include a thumbnail for an image, etc.

3. Update the website in the browser and enjoy the results.

Filed Under: Wordpress Tagged With: Genesis, Wordpress

The Importance of Change

October 13, 2014 Leave a Comment Netklik

Tweet
Share
Pin
Share
0 Shares

For a few days now I have been thinking about “change”.

Last year has been a year of major changes in the internet industry, such as: the constant changes Google has been making to its algorithms, the accelerated development of new web technologies, the exponential growth of social media, the use of smart phones for all our everyday activities, etc.

I have been trying to decide what the best way to manage these changes is, for small businesses, professionals and individuals.  The “normal” way we used to work up to now is not efficient for at present, and will be less efficient tomorrow, as we live in a state of constant change.

Nowadays, one can’t deny the need to adopt new technologies for professionals and small businesses.  The cost of not adopting new technologies to promote a business is very elevated, not only because we can’t afford not to do it while our competitors are doing it, but also because as a business and individual we are not learning.  It is important to have a flexible attitude and to maintain our business focus, while enjoying the process.

Filed Under: Business

Steps to Update Thesis for WordPress

October 3, 2014 Leave a Comment Netklik

Tweet
Share
Pin
Share
0 Shares

Recently I was adding content to a website that uses Thesis for WorldPress, and was surprised to get the following error: Warning: Illegal string offset ‘type’, with the warning that there was an error in the options options_post.php file. After researching the possible reasons for this new error, which came out of nowhere, everything seemed to indicate that the error could be corrected by updating the version of Theses I had. Since, I thought some of you may also bump into this error as well, I decided to write down the steps to update Thesis for WordPress.

In my case I had version 1.8 and to updated to 1.86.  I studies the updating process suggested by diythemes.com, and here is a summary of the steps I followed:

Steps to Update Thesis for WordPress

  1. The first step was to back up the complete website, using a FTP tool, just in case things did not turn out as expected.  Prevention is better than cure!
  2. Under the Thesis option, go to Manage Options and click on All Design Options to download on the computer the current configuration for Thesis.
  3. Download from diythemes.com the new version of Thesis
  4. Upload the new Thesis file to the server and put in the themes file. After this step, the themes file will include the old and new versions of Theses.
  5. Upload to the server the custom file of the old version and replace with the custom file of the new version.
  6. In the custom file, change the permits for:  cache (file permissions) to 775 (instead of 755).
  7. In the custom file, change the permits for:  layout.css (file permissions) to 666 (instead of 644).
  8. On the WordPress dashboard click on Appearance>Themes and activate the new version.
  9. Click on Design Options and upload the backup file that was installed in the previous version.
  10. Upload the page again and everything should be functioning now!


Filed Under: Wordpress Tagged With: Thesis, Wordpress

Recent Posts

  • How to build today the business of tomorrow
  • Why Some businesses stand out (while others are ignored)
  • How to connect emotionally with your client (In the new era)
  • How to have a more human brand (essential principles)
  • How to pivot your service based business during a crisis

Archives

  • November 2023
  • October 2023
  • April 2020
  • March 2020
  • December 2019
  • October 2019
  • August 2019
  • July 2019
  • June 2019
  • May 2019
  • April 2019
  • March 2019
  • February 2019
  • November 2018
  • September 2018
  • August 2018
  • May 2018
  • February 2018
  • December 2017
  • November 2017
  • October 2017
  • August 2017
  • July 2017
  • May 2017
  • April 2017
  • March 2017
  • February 2017
  • January 2017
  • December 2016
  • November 2016
  • February 2016
  • October 2015
  • March 2015
  • February 2015
  • January 2015
  • October 2014
  • September 2013
  • February 2013
  • August 2012
  • February 2012
  • June 2011
  • May 2011
  • March 2011
  • February 2011
  • January 2011
  • December 2010

Follow me

RSStwitterfacebookpinterestinstagram

Copyright© 2026 · Netklik, LLC | Privacy Policy | Disclaimer