When we create websites in WorldPress, it is advisable to always work with a child theme. The reason is that when theme developer, in this case www.studiopress.com makes changes to the Genesis framework, this changes will not affect our website.
How can we safely personalize a child theme using custom.css?
The same applies to when we personalize a child theme in WordPress. We have to make sure we are doing it in a safe way. It is recommended we create a new css file, custom.css, where one includes the theme personalization. Next, I will describe the steps I followed to achieve this.
Step 1: Create a custom.css file
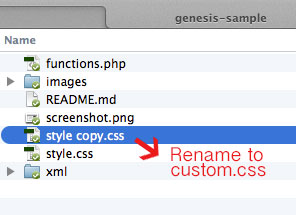
Make a duplicate copy of the style.css found in the child theme file. For our example, I am using the Genesis child them and am renaming it custom.css on my computer.
Step 2: Update the information of the custom.css file
In a text editor open the new custom.css document and delete everything except the details that describe the document, found in the upper part.
/* # Genesis Sample Child Theme
Theme Name: Genesis Sample Theme
Theme URI: http://my.studiopress.com/themes/genesis/
Description: This is the sample theme created for the Genesis Framework.
Author: StudioPress
Author URI: http://www.studiopress.com/
Template: genesis
Template Version: 2.1.2
Tags: black, orange, white, one-column, two-columns, three-columns, left-sidebar, right-sidebar, responsive-layout, custom-menu, full-width-template, rtl-language-support, sticky-post, theme-options, threaded-comments, translation-ready
License: GPL-2.0+
License URI: http://www.gnu.org/licenses/gpl-2.0.html
*/
It is important to change the Theme name: it should read:
Theme Name: Genesis Sample Theme - Customized
Step 3: FTP the custom.css file to the server
The next step is to upload the custom.css file to the serves through a FTP tool. For our example, the location will be: wp-content/themes/genesis-sample
Step 4: Associate the Genesis with the new custom.css file
Now we have to tell Genesis to read this file, and to do this we have to click the Genesis>Theme Settings option on the dashboard. In the section that reads Header and Footer Scripts, under: “Enter scripts or code you would like output to wp_head(): we have to add the following codes:
<link rel='stylesheet' type='text/css' href='http://www.mywebiste.com/wp-content/themes/genesis-sample/custom.css' media='all' />
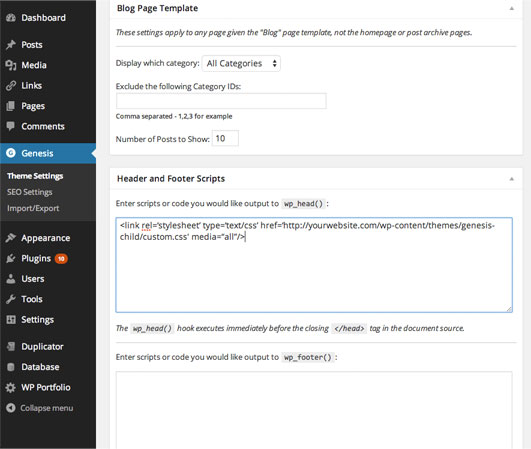
Click on Save Settings found in lower part of the page. This is the last step. Now we can go to Appearance>Editor and we can see the custom.css file that we just created, and where we will personalize the Genesis Child Theme.


Leave a Reply